The Mouthwatering Story Behind This Stuffed Beef Roll
In the realm of comfort food that impresses, few dishes can rival the magnificent stuffed beef roll. This culinary masterpiece transforms humble ground meat into an elegant, flavor-packed meal that looks as spectacular as it tastes. Originating from European cuisine traditions, particularly Italian “polpettone” and German “falscher hase,” the stuffed meat roll has evolved into countless delicious variations around the world.
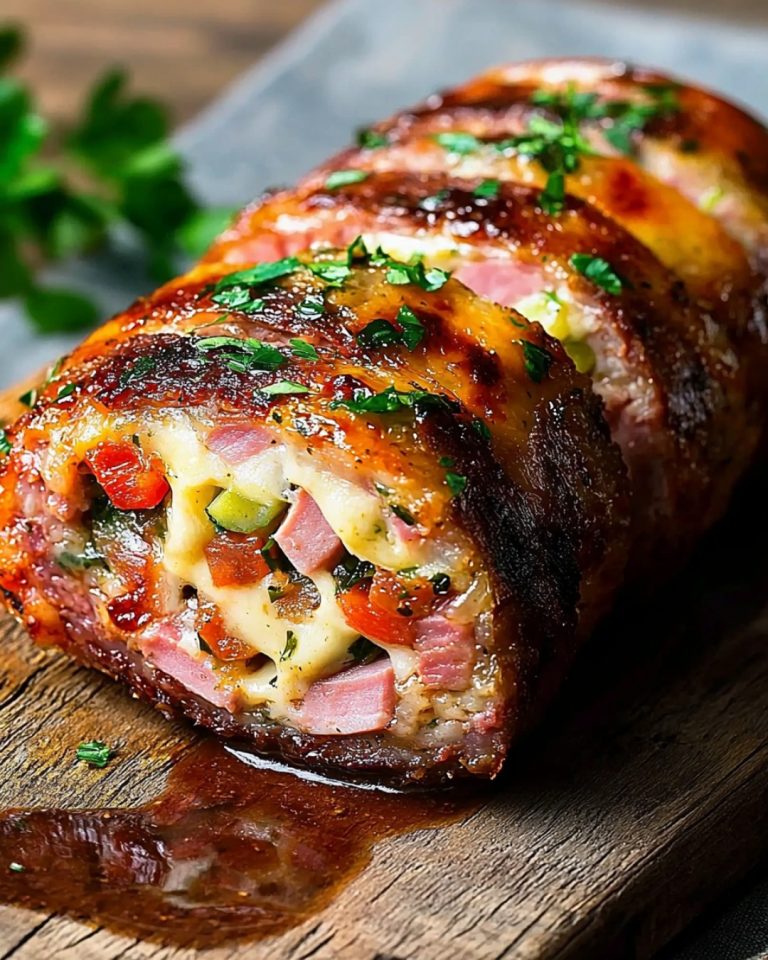
What makes this particular recipe so special is the perfect balance between accessibility and wow-factor. With everyday ingredients arranged in a creative way, you can create a dish that slices open to reveal a stunning spiral of colors and textures that will impress family and dinner guests alike. The combination of tender seasoned meat embracing melted cheese, savory ham, and colorful vegetables creates an explosion of flavors in every bite.
This beef roll has earned its place as a beloved family recipe because it offers the ultimate versatility. Whether you’re planning a special Sunday dinner, need a showstopper for a holiday table, or simply want to elevate your weeknight meal rotation, this recipe delivers exceptional results with surprisingly straightforward preparation. The beauty of this dish lies not just in its appearance but in how it brings people together around the table, eyes widening as you slice through to reveal the perfect spiral within.
Best of all, this recipe allows for endless customization based on your preferences and what you have available. It’s a delicious way to reinvent the classic meatloaf into something spectacular that will have everyone asking for seconds.
Ingredients For This Gourmet Beef Roll
For the Meat Mixture:
- 1 kg (2.2 lbs) ground meat (beef, pork, or a 50/50 blend)
- 2 large eggs
- 1 cup (100g) breadcrumbs
- 1 garlic clove, finely minced
- 1 small onion, grated (about 1/2 cup)
- 1 teaspoon (5ml) Dijon mustard
- 1 tablespoon fresh parsley, finely chopped
- 1 teaspoon (5g) salt
- 1/2 teaspoon (2g) freshly ground black pepper
For the Flavorful Filling:
- 200g (7 oz) cheese slices (mozzarella, gouda, or provolone)
- 150g (5.3 oz) ham or bacon slices
- 1 red bell pepper, roasted and cut into strips
- 1 cup fresh spinach leaves or additional fresh parsley
For the Caramelized Glaze:
- 2 tablespoons (40g) honey
- 1 tablespoon (15ml) mustard (Dijon or whole grain works best)
- 1 tablespoon (15ml) soy sauce
Step-by-Step Cooking Instructions
1. Preheat and Prepare
- Set your oven to 180°C (350°F)
- Line a baking sheet with parchment paper or lightly grease a baking dish
- Gather all your ingredients and ensure meats and cheeses are at room temperature for easier handling
2. Create the Perfect Meat Base
- In a large mixing bowl, combine the ground meat, eggs, breadcrumbs, minced garlic, and grated onion
- Add the mustard, chopped parsley, salt, and pepper
- Using clean hands, mix thoroughly until all ingredients are evenly incorporated
- Continue kneading for 2-3 minutes until the mixture becomes cohesive and slightly sticky
- This thorough mixing ensures the meat will hold together when rolled
3. Form the Foundation
- Lay a large piece of parchment paper or plastic wrap (about 16×20 inches) on your work surface
- Place the meat mixture in the center
- Using moistened hands or a rolling pin covered with plastic wrap, press and shape the meat into a rectangle approximately 10×14 inches and 1/2 inch thick
- Ensure the thickness is uniform to promote even cooking
- Leave about 1 inch of space empty on all sides to help with sealing
4. Create the Flavorful Filling Layer
- Arrange the cheese slices evenly over the meat, leaving a 1-inch border around all edges
- Layer the ham or bacon slices over the cheese
- Distribute the roasted red pepper strips evenly across the surface
- Sprinkle with fresh spinach leaves or chopped parsley
- Gently press the filling into the meat to help it adhere
5. Roll with Precision
- Starting from one of the long sides, use the parchment paper as support to begin rolling the meat over the filling
- Lift the edge of the paper and fold the meat over itself, continuing to roll while peeling back the paper
- Apply gentle pressure as you roll to keep it tight and compact
- When you reach the end, press the seam and ends firmly to seal in the filling
- If necessary, pinch together any cracks or openings in the meat
6. Initial Baking Stage
- Carefully transfer the roll to your prepared baking sheet, placing it seam-side down
- Cover the entire roll with aluminum foil, ensuring it’s well-wrapped but not too tight
- Place in the preheated oven and bake for 30 minutes
- This initial covered baking helps the meat cook through while retaining moisture
7. Prepare the Caramelized Glaze
- While the roll is baking, combine honey, mustard, and soy sauce in a small bowl
- Whisk until fully blended to create a smooth, glossy glaze
- Set aside at room temperature
8. Final Glazing and Baking
- After 30 minutes, carefully remove the roll from the oven
- Peel back the aluminum foil, being cautious of hot steam
- Brush the entire surface generously with the prepared glaze
- Return the uncovered roll to the oven
- Bake for an additional 15-20 minutes until the exterior is beautifully caramelized and the internal temperature reaches 160°F (71°C)
- For extra caramelization, brush with additional glaze halfway through this final baking period
9. Rest and Serve
- Remove from the oven and let rest for 10 minutes before slicing
- This resting period is crucial as it allows the juices to redistribute throughout the meat
- Transfer carefully to a serving platter
- Slice into 1-inch thick rounds to showcase the beautiful spiral pattern
- Garnish with fresh parsley sprigs
- Serve warm with your choice of side dishes
Nutritional Information and Timing
Nutritional Information (Per Serving, approximately 1-2 slices):
- Calories: 320-350
- Protein: 28g
- Carbohydrates: 12g
- Fat: 18g
- Fiber: 1g
- Sodium: 750mg (varies depending on ham and cheese used)
- Calcium: 15% of daily value
- Iron: 20% of daily value
Timing:
- Preparation Time: 25 minutes
- Cooking Time: 45-50 minutes
- Resting Time: 10 minutes
- Total Time: 1 hour 25 minutes
- Servings: 8-10
Pro Cooking Tips and Tricks
Perfect Meat Selection
For the juiciest result, choose ground meat with approximately 15-20% fat content. While lean meat produces a healthier roll, it can become dry during baking. A mixture of beef and pork creates an ideal balance of flavor and moisture. If using purely beef, consider adding 2 tablespoons of olive oil to the mixture for extra juiciness.
Filling Finesse
The key to a picture-perfect spiral is arrangement. Place your fillings in even, slightly overlapping layers. For cheese that melts beautifully without leaking, opt for slices rather than shredded varieties. Pre-cooking ingredients like bacon or vegetables ensures they’ll be perfectly done when the meat is ready.
Rolling Mastery
Slightly wet hands prevent sticking when working with the meat mixture. For easier handling, you can chill the shaped meat rectangle for 15 minutes before adding fillings. If the roll cracks during shaping, simply press the meat back together – it will seal during cooking.
Temperature Matters
Using a meat thermometer is the most reliable way to ensure your roll is perfectly cooked without cutting into it. The ideal internal temperature is 160°F (71°C) for ground beef. For a beautiful exterior without burning, lower the oven temperature to 325°F (165°C) and extend the cooking time if you notice the glaze browning too quickly.
Slicing Secrets
Use a sharp knife and clean it between cuts for picture-perfect slices. Allowing the roll to rest for a full 10 minutes is crucial – cut too soon and you’ll lose precious juices and the roll may fall apart. For presentation-worthy slices at a dinner party, consider chilling the fully cooked roll for 2 hours before slicing, then reheating the slices gently.
Recipe Variations and Substitutions
Mediterranean Inspiration
Transform this roll with Mediterranean flavors by using a mixture of ground lamb and beef, filling it with feta cheese, sun-dried tomatoes, and fresh spinach. Add 1 teaspoon of oregano and 1/2 teaspoon of ground cumin to the meat mixture, and replace the glaze with olive oil mixed with lemon juice and minced garlic.
Low-Carb Adaptation
Make this dish keto-friendly by replacing breadcrumbs with 1/2 cup of almond flour or crushed pork rinds. Use a mixture of cheddar and cream cheese for the filling, and replace the honey in the glaze with a sugar-free maple syrup or a tablespoon of powdered erythritol mixed with a bit of water.
Vegetable-Packed Version
Boost the nutritional value by adding 1 cup of finely chopped mushrooms and 1/2 cup grated zucchini to the meat mixture. For the filling, consider adding a layer of sautéed spinach with garlic, roasted eggplant slices, or caramelized onions.
Spicy Variation
Create a Mexican-inspired version by adding 2 tablespoons of taco seasoning to the meat mixture. Fill with pepper jack cheese, chorizo instead of ham, and roasted poblano peppers. Glaze with a mixture of chipotle sauce, honey, and lime juice for a smoky finish.
Breakfast-Inspired Roll
For a brunch showstopper, incorporate 1/2 cup of cooked and cooled hash browns into the meat mixture. Fill with scrambled eggs, breakfast sausage, and cheddar cheese. Serve slices with a drizzle of maple syrup or hollandaise sauce.
Frequently Asked Questions
Q1: Can I prepare this beef roll ahead of time? A: Absolutely! You can prepare the roll up to 24 hours in advance and keep it refrigerated, well-wrapped in plastic, until ready to bake. Alternatively, you can fully cook the roll, cool it completely, and refrigerate for up to 3 days. Reheat covered in a 300°F (150°C) oven until warmed through, about 20-25 minutes.
Q2: My roll split open during baking. How can I prevent this? A: This typically happens when the seam isn’t properly sealed or the filling is too abundant. Make sure to leave adequate border space around the edges, don’t overfill, and firmly press the seam and ends when rolling. Placing the roll seam-side down and letting it rest for 10 minutes before baking can also help the meat “set” in position.
Q3: Can I freeze this stuffed beef roll? A: Yes, this dish freezes beautifully! You can freeze it either before or after baking. For unbaked rolls, wrap tightly in plastic wrap, then aluminum foil, and freeze for up to 3 months. Thaw completely in the refrigerator before baking. For baked rolls, cool completely, slice if desired, and freeze in airtight containers for up to 2 months. Thaw and reheat in the oven for best results.
Q4: What side dishes pair well with this stuffed beef roll? A: This versatile main dish works wonderfully with a variety of sides. Traditional companions include mashed potatoes, roasted vegetables, or a fresh green salad. For a complete meal, consider serving with garlic butter pasta, steamed asparagus, or a wild rice pilaf. The caramelized exterior also pairs beautifully with tangy sides like a vinaigrette-dressed salad or pickled vegetables.
Q5: How can I ensure the meat is cooked through without drying it out? A: The two-stage baking process (covered, then uncovered) helps prevent the meat from drying out while ensuring it cooks thoroughly. Using a meat thermometer is the most reliable method—insert it into the thickest part of the roll; when it reaches 160°F (71°C), the meat is safely coo